
The Flex integration adds three cards to the right-hand sidebar of your HubSpot records: Flex Contact, Flex Company, and Flex Deal. Each card shows whether the HubSpot record is connected to its counterpart in Flex Rental Solutions, lets you create or connect that counterpart without leaving HubSpot, and opens the linked record in Flex in one click.
Without the integration, keeping a contact, company, or job aligned across both systems means re-typing the same details twice and checking two tabs to find out which one is current. Once a record is linked, Loomium keeps the two sides in sync for you.
Contents
- Terms you will see
- Installing the integration
- Finding the cards in HubSpot
- How linking works
- Customising what a linked card shows
- The Flex Contact card
- The Flex Company card
- The Flex Deal card
- What syncs, and when
- Messages you may see
- Need help?
Terms you will see
- Flex Contact — a person record in Flex. The Flex Contact card links a HubSpot contact to one of these.
- Flex Company — an organisation record in Flex. In Flex these live alongside contacts (Flex creates them under Contacts > New Company). The Flex Company card links a HubSpot company to one of these.
- Project Element — the Flex object that represents a job (often called Event Folder). The Flex Deal card links a HubSpot deal to one of these.
- Linked / Unlinked — a HubSpot record is Linked once it holds the ID of its Flex counterpart, and Unlinked until then. Each card tells you which state it is in as soon as it loads.
- Resource Type — Flex's category for a contact or company, such as
ClientorVendor. Shown on the card once linked.
Installing the integration
You only do this once, for your whole company.
- Log in to Loomium at app.loomium.io.
- In the left navigation, click Marketplace.
- Open the Integrations category, then open HubSpot. You can also go straight to
app.loomium.io/marketplace/details/integrations/hubspot. - Click Subscribe now (or Start free trial, if a trial is offered for your account) and complete checkout.
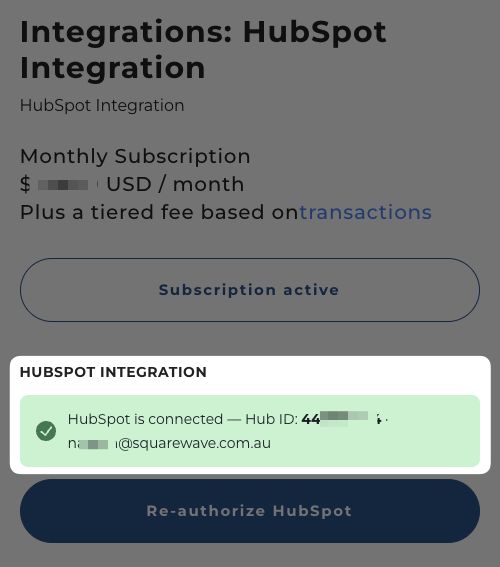
- When checkout finishes you pass through a short Redirecting to config page step and land back on the HubSpot integration page. The subscribe button is replaced by Subscription active, and a HubSpot Integration section appears below it.
- In that section, approve the HubSpot authorisation prompt. In most cases Loomium sends you to HubSpot's consent screen automatically as soon as you land back on the page; if it does not, click Authorize with HubSpot.
- Approve the requested permissions in HubSpot. You are returned to the Loomium integration page, which now shows HubSpot is connected along with your Hub ID.
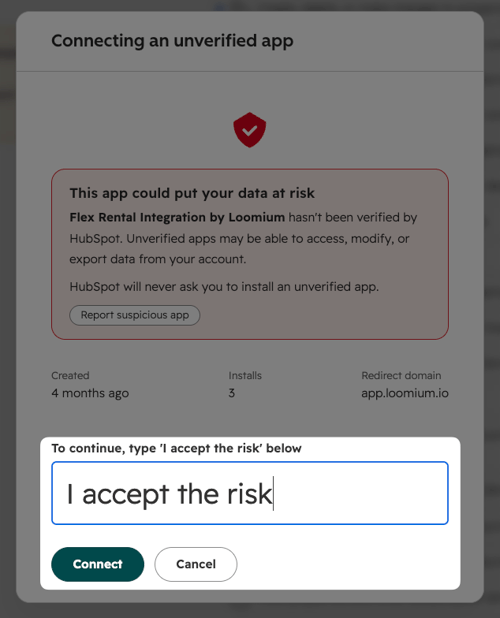
Note: Buying the subscription in step 4 requires a Loomium super administrator. Other users see Request trial from your administrator instead, which sends the request on your behalf. Connecting the HubSpot account in step 6 does not need super-administrator rights — anyone with access to the subscription can do it — but approving the HubSpot consent screen requires a HubSpot user with permission to grant the requested CRM scopes.
Note: You do not have to connect Flex first. HubSpot authorisation succeeds on its own; if no Flex instance is connected yet, the page shows HubSpot is connected, but setup is incomplete and links you to Mission Control to finish the Flex side. The cards do not work until that is done.
Re-authorizing
Return to the same page any time to check the connection. The button reads Re-authorize HubSpot once a connection exists, and the status message tells you whether anything needs attention:
- HubSpot is connected — nothing to do. The message names the connected Hub ID and user.
- Re-authorization recommended — the connection works but is missing one or more permissions the integration needs. The missing permissions are listed; re-authorise to add them. Re-authorising from this state does not ask for confirmation.
- Re-authorization required — the stored connection could no longer be validated. Re-authorise to restore it. This state does not ask for confirmation either.
- Unable to check HubSpot connection status. Please refresh the page. — refresh the page. The re-authorise button is unavailable while this is showing.
Re-authorizing from the HubSpot is connected state asks you to confirm first, because it replaces the existing connection.
Finding the cards in HubSpot
Once the integration is authorized, the cards appear automatically on your HubSpot contact, company, and deal records — there is no separate app to install in HubSpot.
New cards are added to the bottom of the right sidebar, so on a record with many cards you may have to scroll to find them. To move a card:
- Hover over the empty space to the left of the card's title. The cursor becomes a hand.
- Drag the card to the position you want.
Cards you move stay where you put them.
How linking works
All three cards work the same way, so learning one teaches you all three. The deal card adds one requirement of its own, covered in The Flex Deal card.
Unlinked. The card tells you the record has no Flex counterpart and offers a + Link menu with two choices:
- Link existing … — opens a panel where you search Flex and pick the record to connect.
- Create new … — creates a brand new record in Flex from the HubSpot record's details, then links the two.
Creating. Choosing Create new shows a short confirmation describing exactly what will be created. Click the create button to go ahead, or Cancel to back out — nothing is sent to Flex until you confirm.
Linking to an existing record. Type a search term and click Search. Results appear in a table; click Link on the row you want. Flex records already linked to another HubSpot record are left out automatically, and you cannot link to something that no longer exists.
Linked. The card shows the Flex record's details in a small tile of labelled rows, plus Sync and Unlink buttons. The heading is a link — click it to open the record in Flex in a new tab. (The heading only becomes clickable once Flex has returned a deep link, which happens on the first sync.) Which rows the tile shows is an administrator setting — see Customising what a linked card shows.
Refreshing. The cards keep an eye on the record and update themselves when something changes, so you rarely need to reload the page. Sync forces an immediate sync of that one record when you do not want to wait for the automatic refresh or the next scheduled run. The deal card's no-contact warning also offers Check again as a backup.
Unlinking. Click Unlink. There is no confirmation prompt, because unlinking is safe and reversible:
- It clears the connection on the HubSpot side only. Nothing in Flex is changed or deleted.
- It does not cascade. Unlinking a contact leaves its company linked; unlinking a company leaves its contacts linked; unlinking a deal leaves its contacts and companies linked.
- The Flex record becomes available in search again straight away, so you can re-link it whenever you like.
One HubSpot record links to at most one Flex record, and one Flex record to at most one HubSpot record.
Customizing what a linked card shows
The rows on a linked card are not fixed. An administrator can change the card's heading and choose which properties appear, on the Flex integration settings page in HubSpot:
- The heading — for example Event Dates: on a deal, Contact Details: on a contact, Company Details: on a company.
- The rows — each row is a label and a property. The label can be custom text or the property's own name; the value is always a property from the HubSpot record.
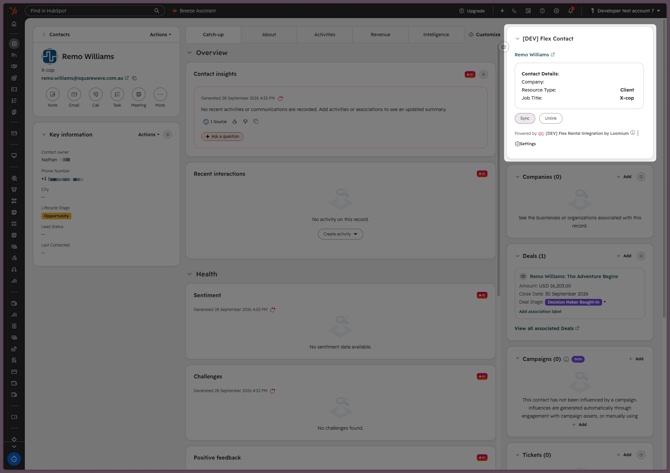
By default the contact card shows Company, Resource Type, and Job Title, the company card shows Resource Type, and the deal card shows the Flex start date, end date, and setup date. If your cards look different from that, an administrator has changed them — see the HubSpot Integration Settings guide.
The Flex Contact card
Appears on HubSpot contact records.
When unlinked
The card reads "This contact is not linked to a Flex contact."
- + Link > Create new contact — confirms with "Create a new Flex contact for "[name]" and link it to this contact. Flex assigns the barcode." Click Create contact.
- + Link > Link existing contact — opens the Link Flex Contact panel. Search by name, then click Link on the row you want. Results show Name, Company, Resource, and Job Title; each column sorts, and results are paged 20 at a time.
When linked
The card shows the contact's name as the heading (click it to open in Flex), followed by the card's rows — by default Company, Resource Type, and Job Title — plus Sync and Unlink buttons.
The Flex Company card
Appears on HubSpot company records. It works exactly like the contact card.
When unlinked
The card reads "This company is not linked to a Flex company."
- + Link > Create new company — confirms with "Create a new Flex company and link it to this company." Click Create company.
- + Link > Link existing company — opens the Link Flex Company panel. Search by name and click Link. Results show Name and Resource.
When linked
The card shows the company name as the heading (click it to open in Flex) and the card's rows — by default a single Resource Type row — plus Sync and Unlink buttons.
The Flex Deal card
Appears on HubSpot deal records, and links the deal to a Flex Project Element.
Associate a contact first
A deal cannot be linked until it has an associated contact. Until then the card shows a warning:
No contact associated. Associate a contact with this deal before linking it to a Project Element.
To fix this, scroll to the Contacts section of the deal record, click Add, and pick or create a contact. The card notices the new association on its own and switches to the unlinked view; Check again is there as a backup if it does not.
When unlinked
The card reads "This deal is not linked to a Project Element."
- + Link > Create new Project Element — confirms with "Create a new Flex Project Element named "[deal name]" and sync it to this deal." Click Create Project Element. The new element takes its name from the deal name, so name the deal before you create.
- + Link > Link existing Project Element — opens the Link Project Element panel. Search by name or number, then click Link. Results show Name and Number.
When linked
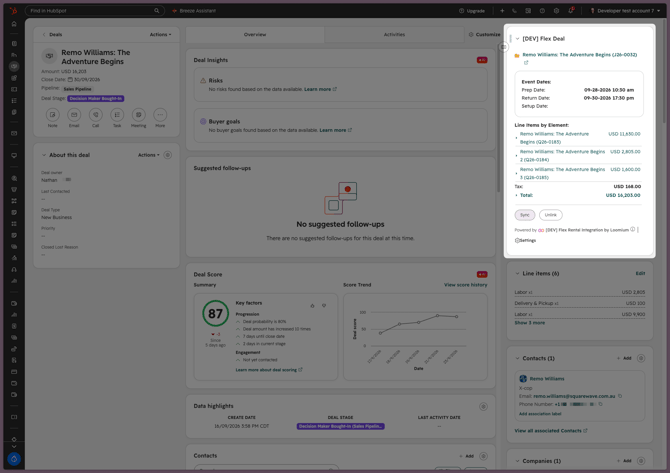
The card heading shows the deal name with the Flex element number and, once Flex has one, its workflow status — for example Magic Pips (Q26-1234) - Confirmed — and links out to Flex. Below it:
- Event Dates — by default Start Date, End Date, and Setup Date, pulled from Flex. An administrator can change this tile's heading and rows.
- Line Items by Element — the deal's line items grouped by the Flex Quote they belong to, each group expandable to show individual items and amounts. A Total: row at the bottom is itself expandable into a consolidated list of items by name. If Flex has not sent financial data yet, this reads "No line items found".
- Sync and Unlink buttons.
What syncs, and when
Linking is only the beginning — once two records are connected, Loomium keeps them aligned. What is kept aligned differs by record type.
Contacts and companies
These sync in both directions, on a schedule.
- For a contact: name, job title, primary email, office phone, mobile phone, and the mailing address.
- For a company: name, phone, and address, plus website. Website travels one way, HubSpot to Flex. Companies have no email in this sync.
Only Flex's Default Mailing address supplies the sync value, and a default shipping address or any other extra address is left alone — except that a separate Flex address which matches the incoming HubSpot address may be promoted to Default Mailing rather than kept as a second address.
When both sides have changed since the last sync, the Contact Precedence setting decides which side wins. It applies to contacts and companies alike, and the default is HubSpot overwrites Flex. The winner is chosen for the record, but the sync writes field by field: a field is only overwritten when the winning side actually holds a value, so a blank never erases the other side, and address parts merge rather than replacing the whole address.
Deals
The deal card writes to Flex when you use it. Create new Project Element writes the element's core details, together with the deal's contacts and companies. Link existing Project Element connects the deal to the element you pick and pulls that element's event dates and financial data back straight away; a created element's dates and financials follow on the next sync. After that, linked deals are kept aligned by the same scheduled sync that covers contacts and companies.
For deals, whichever side was edited most recently wins. There is no precedence setting to change this.
Financial data is one way, Flex to HubSpot. The deal's line items are generated from Flex and grouped by the Quote they belong to. Edits you make to HubSpot line items are never pushed back — to change a deal's financials, change them in Flex.
Timing
Changes made in Flex to a linked contact, company, or deal are picked up by a scheduled sync. It runs every 6, 12, or 24 hours depending on your administrator's setting, and defaults to 24 hours.
Click Sync on a linked card to sync that one record straight away. To have Flex-side changes picked up sooner across many records, ask your administrator to shorten the scheduler frequency.
When the Prevent deal sync without Hubspot contact (person) setting is on (it is by default), a deal whose contact association has been removed is skipped by the scheduled sync rather than synced.
Changing any of this
Contact precedence, matching strategy, scheduler frequency, the deal element, the financial settings, and what the cards show are all administrator settings. They live on the Flex app's settings page in HubSpot — Settings > Integrations > Connected Apps > Flex Rental Integration by Loomium > Settings. See the HubSpot Integration Settings guide for what each one does.
Messages you may see
"Something went wrong talking to Flex. No changes were made." Loomium could not reach Flex, or Flex returned an error. Nothing was written on either side. Click Try again. A failed create or link leaves the record unlinked; a failed unlink leaves it linked.
"Create error: Cannot create a contact that already exists. Use "Link existing contact" instead." (and the company equivalent) A matching record is already in Flex, so Loomium stopped rather than create a duplicate. Click Back to return to the create confirmation, then use the + Link menu and choose Link existing to connect to the record that is already there. Retrying the create will not help.
"This Flex element is already linked to another deal." Deal card only. One Flex Project Element can be connected to only one HubSpot deal, and this one is taken. Search for a different element, or unlink the other deal first.
"No Flex contacts found. Try a different name." (also No Flex companies found / No Project Elements found. Try a different name or number.) Your search returned nothing. Check the spelling, try a shorter or partial term, or search on a different field. Remember that records already linked to another HubSpot record are excluded from results.
"Couldn't search Flex contacts. Please try again." (and the company and Project Element equivalents) The search itself failed to reach Flex. Search again.
"Couldn't link this contact. Please try again." (and the company equivalent) The link did not complete. Nothing was written; click Try again, or Cancel to go back to the results.
"Couldn't sync, try again." The Sync button did not complete and the record is unchanged. Click Try again.
"Couldn't unlink, try again." The unlink did not complete and the record is still linked. Click Try again.
"No contact associated. Associate a contact with this deal before linking it to a Project Element." Deal card only. Add a contact to the deal, then link. See The Flex Deal card.
Need help?
For additional support, visit support.squarewave.com.au or contact your Loomium administrator.